Monday 25 December 2017

Wintery canvas for Gypsy Soul Lasercuts

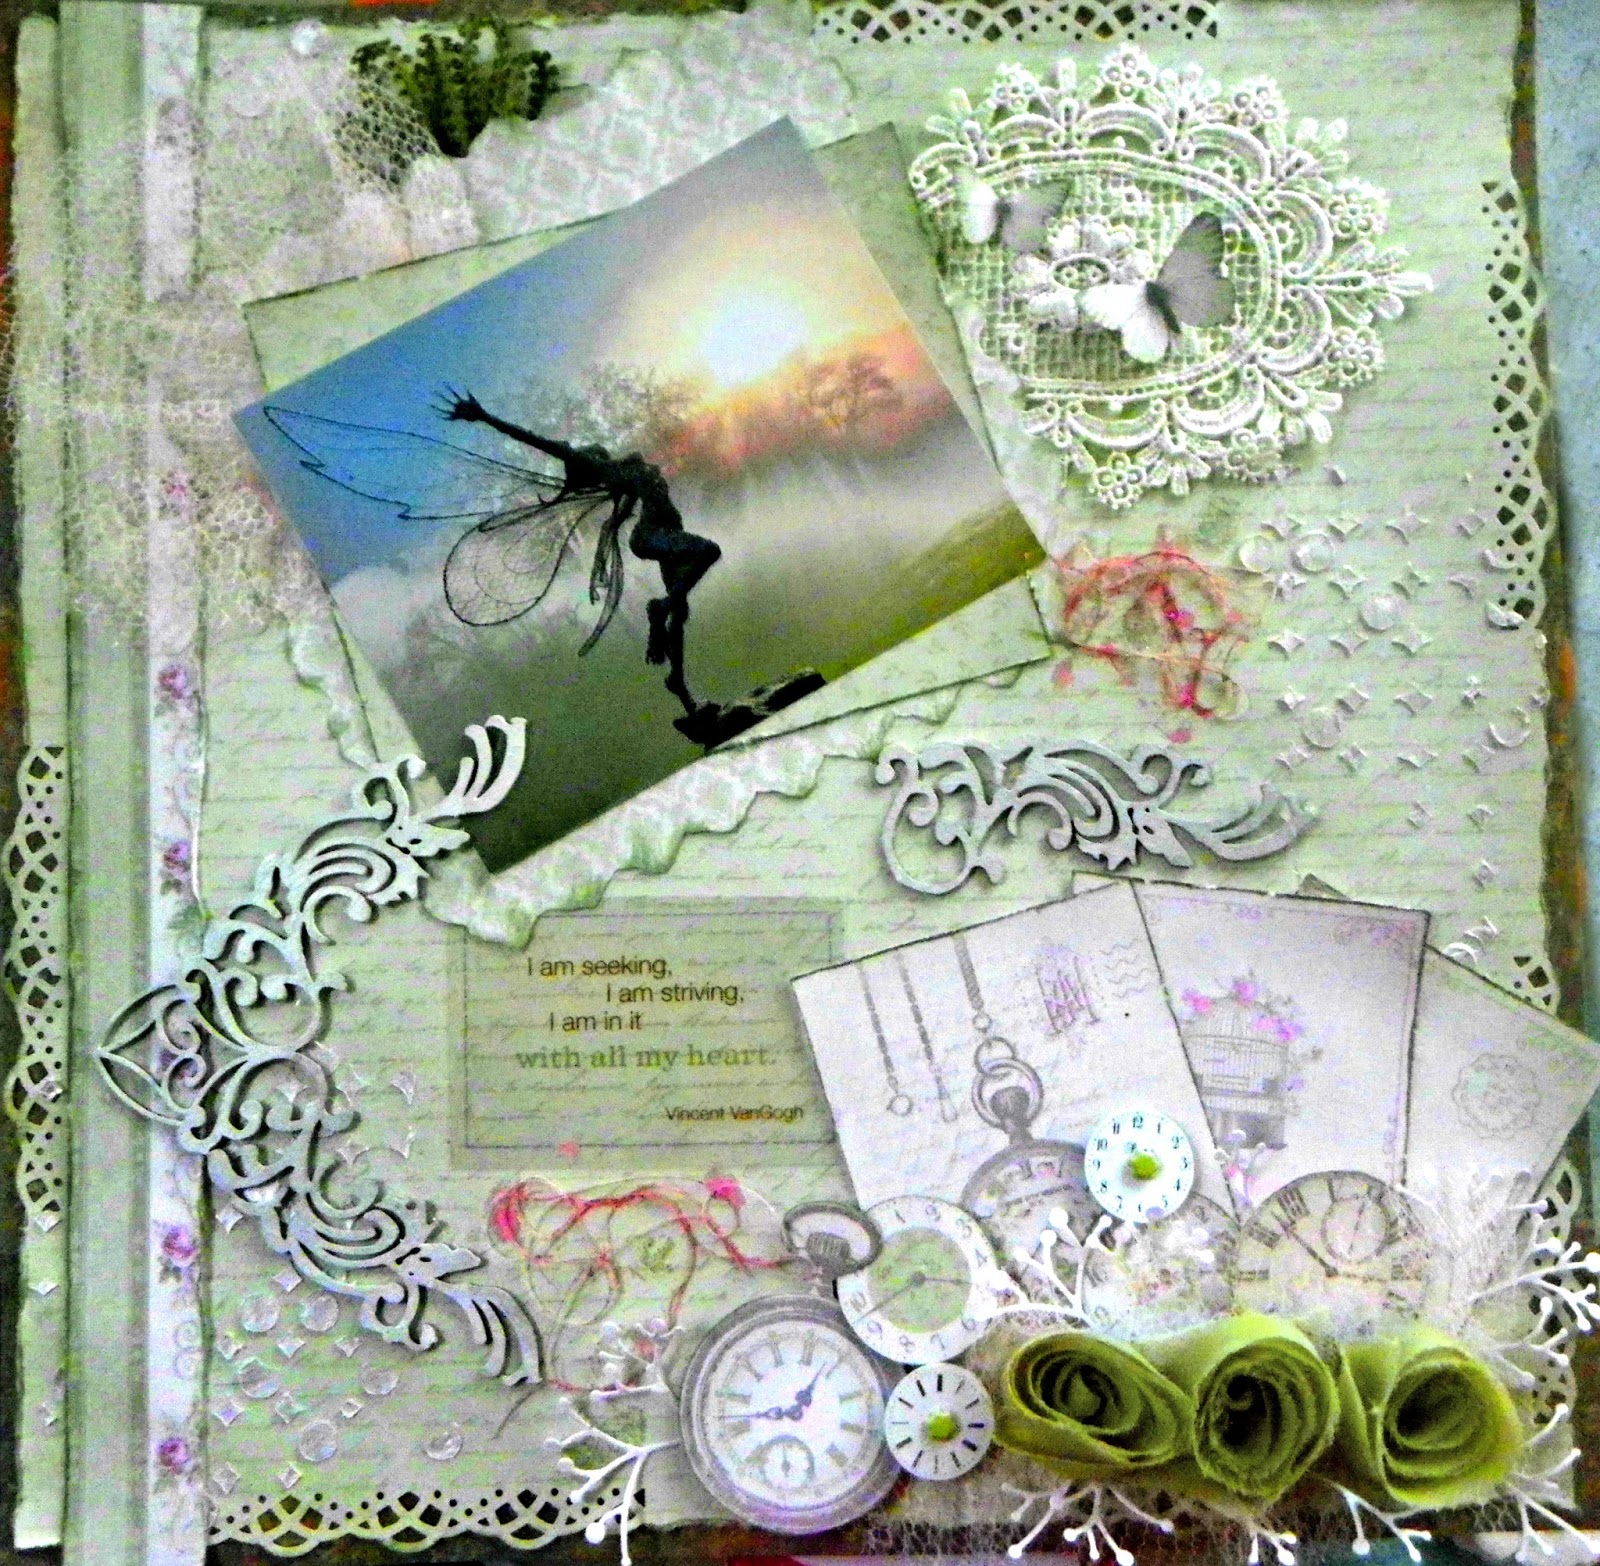
Merry Christmas! Wishing each and every one of you a wonderful, magical day! I've created a glittery, shimmer, magical scene on an 8x8 canvas using some really great chipboard pieces from the Gypsy Soul store.


I used Authentique paper from the Cozy collection for my background, tearing the edges so that it was just a smidge smaller than the canvas. I attached it with Mod Podge and podged the edges to keep then from curling or lifting. Homemade texture paste was added using a Prima stencil.

The tree and snowflakes were primed with white acrylic paint and the deer with tan.


I used texture paste on the surface of the tree to create the feel of snow layered atop branches, then when that was dry I brushed Mod Podge lightly here and there and sprinkled on some clear glass glitter. After allowing that to dry, I misted with Tattered Angels glimmer mist in Olive Vine (one of my favourite shades) The mist took on a slightly darker shade where the Mod Podge was, resulting in a nice variation in the colour.


I brushed the snowflakes with Mod Podge and sprinkled them with glass glitter as well, and brushed the reindeer with white Perfect Pearls to soften the colour and add a subtle sheen, then added a little glass glitter to their backs as well.


The snow was created with Mod Podge and cheesecloth; I just kind of mooshed the cloth into the podge and then added glass glitter....hmmm, a bit of a pattern here-Mod Podge and glass glitter n everything, everywhere!!! When it was dry, the cheesecloth was stiff and held the shape of the "snowbanks" I had created.


You may know that I love squirrels, so I decided my outdoor scene needed a couple of these little cuties-they were cut with a Memory Box die and lightly inked in dark grey.


I glued the tree and snowflakes down and popped up the deer with foam tape for dimension, and added a sentiment to the top, also popped up with foam tape.

Thanks so much for stopping by and checking out my winter creation!

GYPSY SOUL ITEMS USED


OTHER ITEMS USED

Authentique paper-Flurries
Memory Box die-squirrels
clear glass glitter
Mod Podge
Tattered Angels glimmer mist-Olive Vine
Perfect Pearls powder
Prima stencil

Tuesday 19 December 2017

Kaisercraft December Challenge-Christmas Wishes

I love the unique colours in this collection; they may not be traditional Christmas colours but they sure make me feel Christmassy anyway!


The lovely delicate ornaments just begged to be fussy cut and popped up! I added some cheesecloth for a dreamy, soft feel and some acrylic snowflakes dusted with glass glitter.

Isn't that sentiment beautiful? Kaisercraft, you have a way with words! Merry Christmas to all, and thanks for stopping by.

Kaisercraft December Challenge-Frosted

The December Challenge at Kaisercraft is cards, and these papers were perfect; I love that they provide sentiments for card fronts as well as beautiful background papers that are also great for layouts.

I fussy cut flourishes, distressed and inked edges, added some stencilling with texture paste, and added a little lace for extra texture.This actually looks soooo much better in real life; we've had some grey days lately that haven't been great for taking photos. Thanks for looking!

Monday 11 December 2017

A Gift of Love Christmas Sleigh for Gypsy Soul Lasercuts

Hello crafty friends! Many of us are up to our ears in Christmas creating, decorating, baking and what-have-you, and that's a happy place to be! The sleigh is one of my favourite GSL pieces, and I love the one I made for myself last year. My best friend loved it to, so I pulled out my (huge) stash of Christmas papers and told her to pick out what she liked best, and I would use it to make a sleigh for her!


There's a template of the side pieces included in the sleigh kit to trace around on your patterned paper, which is wonderful! I used some lovely old-fashioned Inkido Christmas papers, positioning them so the poinsettia pattern ran along the bottom of the sleigh. I hate measuring, so I also traced around the inside and back/front pieces and glued papers on them before putting the sleigh together.

I dry-embossed the fancy overlay and painted it gold before heat embossing it in antique gold.
(I painted the skis and edges of the main side pieces gold as well.)


I rubbed the edges with bronze ink for a richer look.


When attaching the overlay, I used these adorable itty-bitty clamps my hubby put in my Christmas stocking last year....they are soooo handy for gluing things together, holding them tight until the glue sets.


The bells were cut from another sheet of Inkido paper and were heat embossed with UTEE before being attached with thick Glue Dots. I used a larger one for the front of the sleigh.


When everything was put together, I placed a piece of styrofoam in the bottom of the sleigh before I added my greenery (which was cut from one of those artificial garlands) I cut the piece smaller than the sleigh because the garland greenery would be tucked around the edge before I added the stand-up embellishments.


The reindeer was already on a wire, but I attached the fussy-cut Santa and sentiment, diecut poinsettias and min wrapped gifts to kitchen skewers, then arranged them in the styrofoam piece. I then bent the wired garland around to cover the remaining styrofoam and showcase the embellishments and sleigh. I'm on a twisted paper kick these days and added a couple strips with Christmas sentiments to the arrangement.


I love Christmas and had a wonderful time putting this together! I love the way you can take any of the Gypsy Soul chipboard items and finish it so many different ways depending on your taste, decor, supplies, etc.

Wishing each of you a wonderful Christmas season, and I do
hope you take time to enjoy a little crafting in the midst of the hustly-bustly preparations!


GYPSY SOUL ITEMS USED

Santa's Sleigh

OTHER ITEMS USED

Inkido papers
Cuttlebug embossing folder
gold acrylic paint
Stampendous gold embossing powder
UTEE
Spellbinders poinsettia die
artificial pine garland

Monday 27 November 2017

Santa's Little Helpers Christmas shadowbox for Gypsy Soul Lasercuts

I wanted to use this house shadowbox for a fun theme, and what's more fun than Christmas, right? I found these cute little elves at a local craft store and pulled out some terrific festive Graphic 45 paper and started playing.

This blown out view shows how the pieces fit together; the two in the middle have slits cut halfway through and they fit together to form an X shape. I like to cover all the pieces with patterned paper and sand & ink the edges before putting 3D items together.


I covered all the pieces and then glued my little house together; I find white glue is usually best.


The snow was made using Faber Castell  Pearl texture paste; I just spread it around with a palette knife, pulling it down to create an overhang.


I heat-embossed the fussy cut embellishments with clear embossing powder to add both sheen and strength. They were then attached with foam tape.

The elves and trees were glued in using a hot glue gun, and the twisted paper strips were attached that way as well. I attached wooden beads as "feet" in the same manner after painting them gold. Some of the paper strips were from the St.Nicholas collection, also by G45.


GYPSY SOUL ITEMS USED

Mini House Room Box, 4 cubbies

OTHER ITEMS USED

Graphic 45 Christmas Carol papers

Aleene's tacky glue
hot glue gun
clear embossing powder, Versamark ink
mini trees from Michael's
Faber Castell Texture Luxe-Pearl

Thursday 23 November 2017

Little Moments layout for Kaisercraft November Challenge

hi! I loved doing the Kaiserbingo challenge so much that I decided to do another page using the same row of items. This layout features the Secret Admirer collection and the photo is of a meeting this summer with a scrapper friend from across the country. Julia saw one of my layouts in Creative Scrapper magazine, which included my town and surname. She used to live in the neighbouring town, and her cousin is married to someone with the same surname (turns out it's my niece!!) Talk about a small world! She was going to be in the area and we made plans to meet up at a local cafe.As of this past week, we've also discovered that we will be on the same design team for 2018....guess we were just meant to meet!


patterned paper only-mixed media-stitching-a favourite quote
are the items in the bingo row I selected:


Thanks so much for stopping by! Happy Thanksgiving to my American friends, and Happy Everything to all of you!

Monday 13 November 2017

"Teacher..." art journal page for Gypsy Soul Lasercuts

Hey crafty folks! Happy November! I've got some Christmas themed projects underway but thought I'd get one more regular project up before I start bombarding you with Jingle Bells and Joy to the World stuff!

This art journal page uses lyrics from a George Michael song that came out when I was just barely out of my teens (yeah, I know I'm dating myself here!) It came to mind recently when I was pondering how difficult some life lessons can be and how I'd really rather not have to go through the experiences necessary to learn them. I think most people can relate to that sentiment at one time or another, and creating this was a form of therapy for me.


I used papers from the Authentique "Curiosity" collection, tearing and collaging them to form the basic background. The collection has the feel of an old-time classroom, so I thought it was perfect for the "Teacher" theme and lyrics...


I painted all the chipboard pieces with red acrylic paint first, using pieces from the Vintage School Set, the Eyeglasses Shape Set and the Scribbled Frames and Lines set.


I then rubbed them with the black ink and silver wax, the apple with much less and the eyeglasses with quite a bit more. Those two pieces were heat-embossed with UTEE, and all the others were brushed with the matte medium to keep the product from rubbing onto the facing page in my art journal.


These two after UTEE was added:


I stencilled with the clear paste then rubbed over the stenciling with the black soot ink when it was dry; the letters and numbers are a Tim Holtz stencil.


I found this word on one of the papers and tore it out separately to use as art of the journaling. Circling it with red pen makes it stand out and adds to the classroom feel.


I added some misting with a couple shades of yellow and some tan and white sprays, then attached the journaling strips which were cut from some of the coordinating paper.

 I did some hand journaling around the edges after this photo was taken, printing in block letters to stay with the theme. Thanks for checking out my page, and may all your visits to the School of Life be happy ones!


GYPSY SOUL ITEMS USED

Vintage School Set (contact store)
Eyeglasses Shape Set
Scribbled Frames and Lines

OTHER ITEMS USED

Authentique Curiosity collection 
Ranger Black Soot Ink
Red acrylic paint
Prima Art Alchemy Metallique Wax-Aged Iron
UTEE (Ultra thick embossing powder)
Ranger transparent gloss texture paste
Ranger Multi Medium Matte
Tim Holtz stencil-Schoolhouse

Sunday 12 November 2017

Cherish Layout for Kaisercraft November Challenge


I've been working on my Christmas cards and a few other projects lately, and it felt sooo good to create a layout this past week; as much as I enjoy all sorts of crafting, layouts are my first love and they bring me a special satisfaction.


I created this page for Kaisercraft's November Challenge, which is Kaiserbingo!


You choose any vertical, horizontal or diagonal row of 4 items and include those on your page....I chose:
favourite quote, stitching, printed papers only, and mixed media

This was fun and I think I may want to do another before the end of the month....hmmmm....which 4 will I choose next??

Monday 23 October 2017

Halloween Card and Treat Box for Gypsy Soul Lasercuts

Fall is in the air, and it won't be long before the cute little princesses, dinosaurs and ghosties will be knocking on our doors in search of something sweet! I figured it was definitely time to get into the spirit of things, and a card with a matching treat box seemed pretty festive.


I used BoBunny "Burnt Orange Dot" paper (the non-dotty side) for the card base and for the box. I made the box by taking apart a mini takeout box and tracing around it; mine came out a little more square, but that was okay with me.


I inked the edges of both pieces quite heavily with Ranger Black Soot ink, rubbing it around with my finger. The chipboard witches and fence were primed in black, and the moons in antique white, then set aside to dry.


The evergreen trees were diecut in black, and the birch trees in grey. The birch trees were rubbed with Black Soot ink for a mottled look. I cut the grass by hand in black.

The witches and fence were heat-embossed with Ranger glitter embossing powder-love the sparkles!


I ran the moons through a Cuttlebug cheetah print embossing folder, and the pattern was a little more defined than I'd had in mind, so I ran them through between two flat plates to lessen the depth of the pattern. I then heat embossed them in Chablis (sorry,maker unknown-I got it at a yard sale and LOVE it!)


The "Boo!" that I attached to the treat box was painted bright purple, then brushed with a mixture of  Lindy's Magical sweet violet purple teal and a little water; the blending of colours in this product really does look magical!


Chipboard items were all attached with white glue, other than the "Boo!" which was tied on with thread. I added some bits of ribbon to the handle of the box as well, just for a little extra interest. 


These projects were simple and fun to create-no complicated techniques, and you could just attach paper to an existing box rather than tracing one out to further simplify the process. Thanks so much for stopping by and may your Halloween be happy and full of sweet stuff...like chocolate!

GYPSY SOUL ITEMS USED
Spooky Shape Set
Rickety Fence with Cats

OTHER ITEMS USED

Bo Bunny paper-Burnt Orange Dot
Cuttlebug embossing folder
Ranger Black Soot ink
Ranger embossing powder-Black Sparkle
Impression Obsession Birch Tree die

Saturday 14 October 2017

Anne Sullivan page for 7 Dots Sept/Oct Challenge


I created a layout for the current challenge at 7 Dots Studio (the link to the challenge can be found HERE) The theme is a favourite historical figure, and I chose Anne Sullivan, who was Helen Keller's teacher, mentor and lifelong friend. Pretty much everyone knows who Helen Keller was, but few recognize the name of the person responsible for her success and even her very ability to communicate. I've always admired her dedication and commitment, as well as the love and devotion she felt for Helen. Visually impaired herself, she spent hours reading and spelling the books out to Helen via sign language on her hand, and did this with textbooks and lectures throughout Helen's education, including Harvard university. 


I used the lovely Thoughts Keeper collection paper for my page, and added Prima and Recollections flowers, some edge punching with a Martha Stewart punch, misting in Mister Huey's Classic Tan, and some bits and pieces from my stash. The quote reads, "It is a rare privilege to watch the birth, growth, and first feeble struggles of a living mind; this privilege is mine."

Thanks so much for stopping by and  have a terrific day!

Wednesday 11 October 2017

"Delicate" layout for More than Words October Challenge

hi there friends! As soon as I saw the prompts for this month's challenge on More than Words, I knew it was right up my alley; I love creating soft, delicate layouts and incorporating fabric into my projects.


You can find information about their challenge HERE


I have made several layouts with photos of these gorgeous wire fairies; I love that they are so delicate while being made of such strong material. I found the images on Facebook, made by a company called Fantasy Wire. I chose delicate pastel papers from Pion Design and incorporated several different types of fabric/fiber to my page-the ribbon roses, vintage doily, tulle, green cloth ribbon, and thread. The chipboard pieces are very ornate and delicate as well. I loved both prompts and enjoyed using them to create this page! Thanks for stopping by to look :)